I live in the world of grandbabies. My world revolves around my babies. I am so blessed that 3 of the grandbabies (oh ya and their parents too ..lol) live on the opposite end of our house. They give Nana a reason to get out of bed in the morning! My other grandbabies come and visit too, and Nana loves having them visit too! Everyone that said grandbabies are more fun than your own children were right. All this time I thought they were crazy, until I got my first grandbaby. I am still in awe over how much you can love a child that you didn't give birth to. Of course I love my daughters too, but not near as much as my grandbabies! lol Nana loves you Kaylee, Allan, Clayton, Isabel, and Keegan!

Saturday, December 6, 2014

Fantastic Christmas Ornaments!!

I made some floating ornaments, and some glittered ornaments to sell at local craft shows and I LOVE, LOVE, LOVE how they turned out!!!


Friday, September 26, 2014

Boo Crew Halloween FB Hop September 27 & 28

Welcome everyone to The Boo Crew Halloween FB Hop. We will be showcasing Craftin Desert Divas Stamps, KaDoodle Bug Designs and Too Cute By Jessica patterns. Are you ready for a spooktacular hop? Our DT ladies have some frightfully cute creations to share with you.Of course our hop has some AMAZING sponsors! We have some freebie patterns too, you have to hop to find the link to the freebie patterns. CDD, KBD and TCBJ are all having SALES this weekend! There are also 2 special discount codes below to use during this hop. 

The prizes up for grabs are:KBD - 2 - $15 GC. TCBJ - $30 GC. Craftin Desert Divas - One stamp set each day of hop.Stamp N Storage - $50 GC. Therm O Web - $25.00 Gift Card. Spectrum Noir - 2 six-pack of Spectrum Noir Markers. Xyron - 5" Create-a-Sticker Max valued at $28. Magnolia-licious - Surprise PackDies R Us - $10 GC. SRM Stickers - Halloween Stickers. Clear Snap - 3 Winners of Crafty Goodies. Really Reasonable Ribbon - Halloween Prize. Wow Embossing Powder - 2 winners. Lovebug Creations - $10 GC. Kathy's Cozies - $20 Off shopping spree.  Vinyl Outlet - Pack of vinyl for 3 Winners!! Fleurette Bloom $10 GC. Tombow - Use Code: Fall20 to get a 20% discount valid 9/27 - 9/30.  Pumpkin Spice - $20 GC.  Kraft Outlet - Mystery Pack full of Kraft Outlet items valued at $20 Use Code: BLOGHOP to save 10%.  To win these prizes all you have to do is comment on the projects in the hop. We will pick winners from different FB pages. So the more you comment the more chances for you to win.  We would love for you to "like" our FB pages, but it's NOT a requirement. We want you to enjoy this hop and join us for our future hops.

For today I've created: This 2 page layout using the tree from TCbJ Boo Fun and the haunted house from TCbJ Trick or Treat file.  They can be found here: http://www.toocutebyjessica.com/category_14/2/Halloween.htm The stamps are from CDD Batty For You set.  It can be found here:  http://www.craftindesertdivasshop.com/category_26/Halloween.htm


I also created a couple cards and a doorknocker (I think that's what it's called! lol) for todays hop using the same CDD stamp set I used above.  The ghosts are from KBD Spooktacular Ghosts 1 & 2 that can be found here:  http://kadoodlebugdesigns.com/shop/index.php?main_page=advanced_search_result&search_in_description=1&zenid=512e481f8507988df894f1006a093b28&keyword=spooktacular+ghosts


I hope you enjoyed my projects, and would love for you to leave me a comment telling me what you think about them!  Also, I'd love to have you become a follower on my blog.  Have a great day and hop on over to the talented Krystal, who is next on the hop line up  http://www.facebook.com/KrystalKlearCreations

 If you should get lost there is a complete line up on the CDD FB page. https://www.facebook.com/CraftinDesertDivas

Thursday, September 11, 2014

LOOK NEW Layouts!

I just thought I would share these new layouts made from cute Kadoodle Bug Designs files.  You can find the files I used to make these layouts as well as so many other cute files at: http://kadoodlebugdesigns.com/shop/


Tuesday, August 26, 2014

How I Paper Piece with a jpeg file

Sometimes I just don't feel like setting up the file to cut and cutting out all the pieces.  Also, I am doing this little tutorial for beginners to paper piecing that don't have the option to cut individual pieces with an electronic cutter, or that do not want to print the pdf (Adobe file) and hand cut all the pieces. This is what the pdf (Adobe) file looks like.  You simply print it out, cut out the pieces, then cut them out of colored cardstock the color you want them.  I do think that some Adobe files are in color so you could print them out and just cut those pieces out and glue them together to make your project, but I'm not positive on that.  I apologize for the print quality I forgot to print this out so I just took a pic of the computer screen.


 Okay, back to the jpeg file.  I'm using the Cute As Can Be File from KaDoodle Bug Designs, and the file can be found here: http://kadoodlebugdesigns.com/shop/index.php?main_page=product_info&cPath=3&products_id=374


Step 1:  I print out 2 pics of the jpeg file I want to use the same size.  Always check the file description when you buy a file to be sure that it comes with a printable file.  Some files do not come with a printable file.  Always save all the other files as well because you never know when you will get a new cutter and need a different type of file for a new machine! :)


Step 2:  Cut out one of the pics.  Sometimes the pics have a lot of intricate cuts like the first page, so I just cut around the outside and leave some of the white show.  Other times they are a lot simpler to cut out such as pic two.  However, I always seem to need my xacto/craft/hobby knife to get in to the tight spots!


Step 3:  Cut out the pieces from the second pic that you want to attach to the first one you cut out with pop dots.  Select as many or as few as you want.  It's all about what you like.  There is no right or wrong in scrapbooking and card making!  After you get them cut out, if you choose to, add all your little white gel pen or black acid free pen marks on the pieces where you want them.  It's easier to do them now than to do them once they are sitting on a pop dot! :)  Also you can add any gems, googley eyes, etc to them as well.


Step 4:  Attach your cut out piece to your project.  This is optional of course, and if I'm doing a layout I don't attach the pieces until I have them all done.  For cards I find it easier to just go ahead and attach it now.


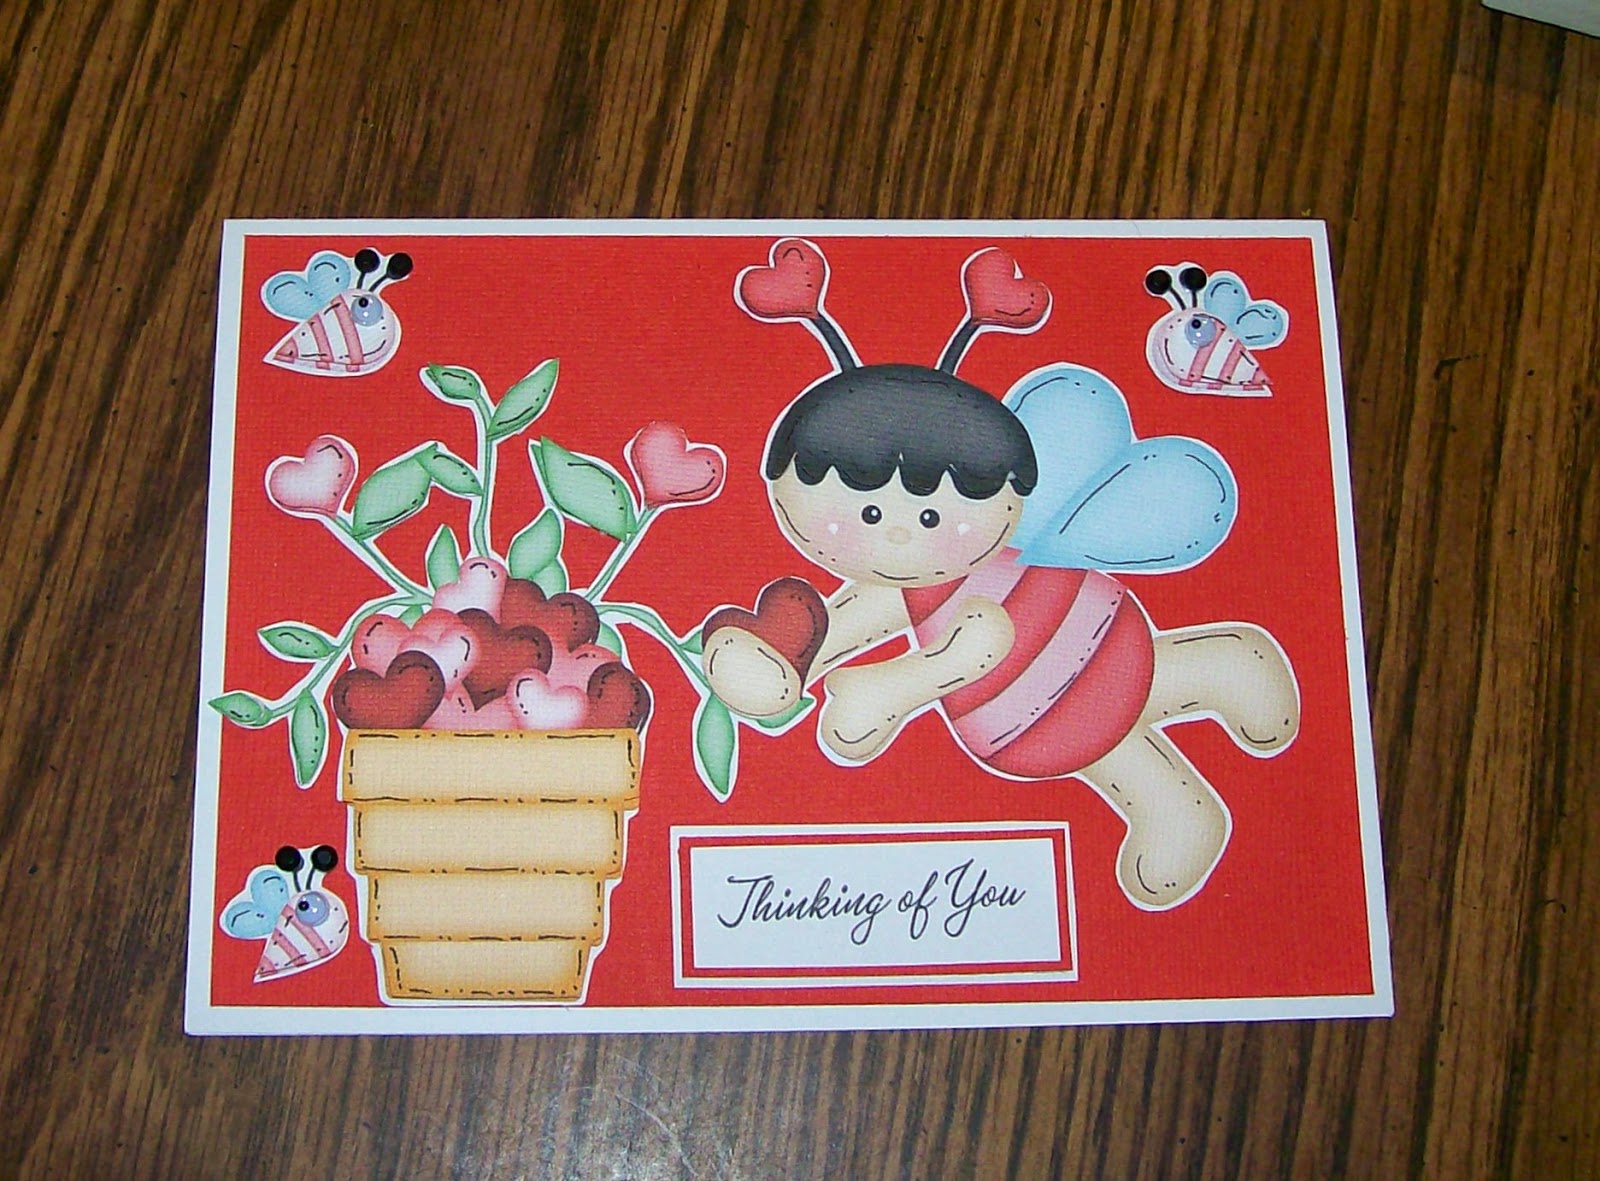
Step 5: Attach the pieces to the top of the same piece on first pic you cut out with pop dots. They will add dimension to your project.  I used black pen a lot of places I would normally use white so that the lines showed up.  This is also a more intricate pic, but it doesn't have to be.  I could have just pop dotted the planter, heart flowers, bees, heart antenneas, and the arm and hand.  It still would have been cute with only a few things popped up!


Step 6:  Mail the card to someone to give them a smile!

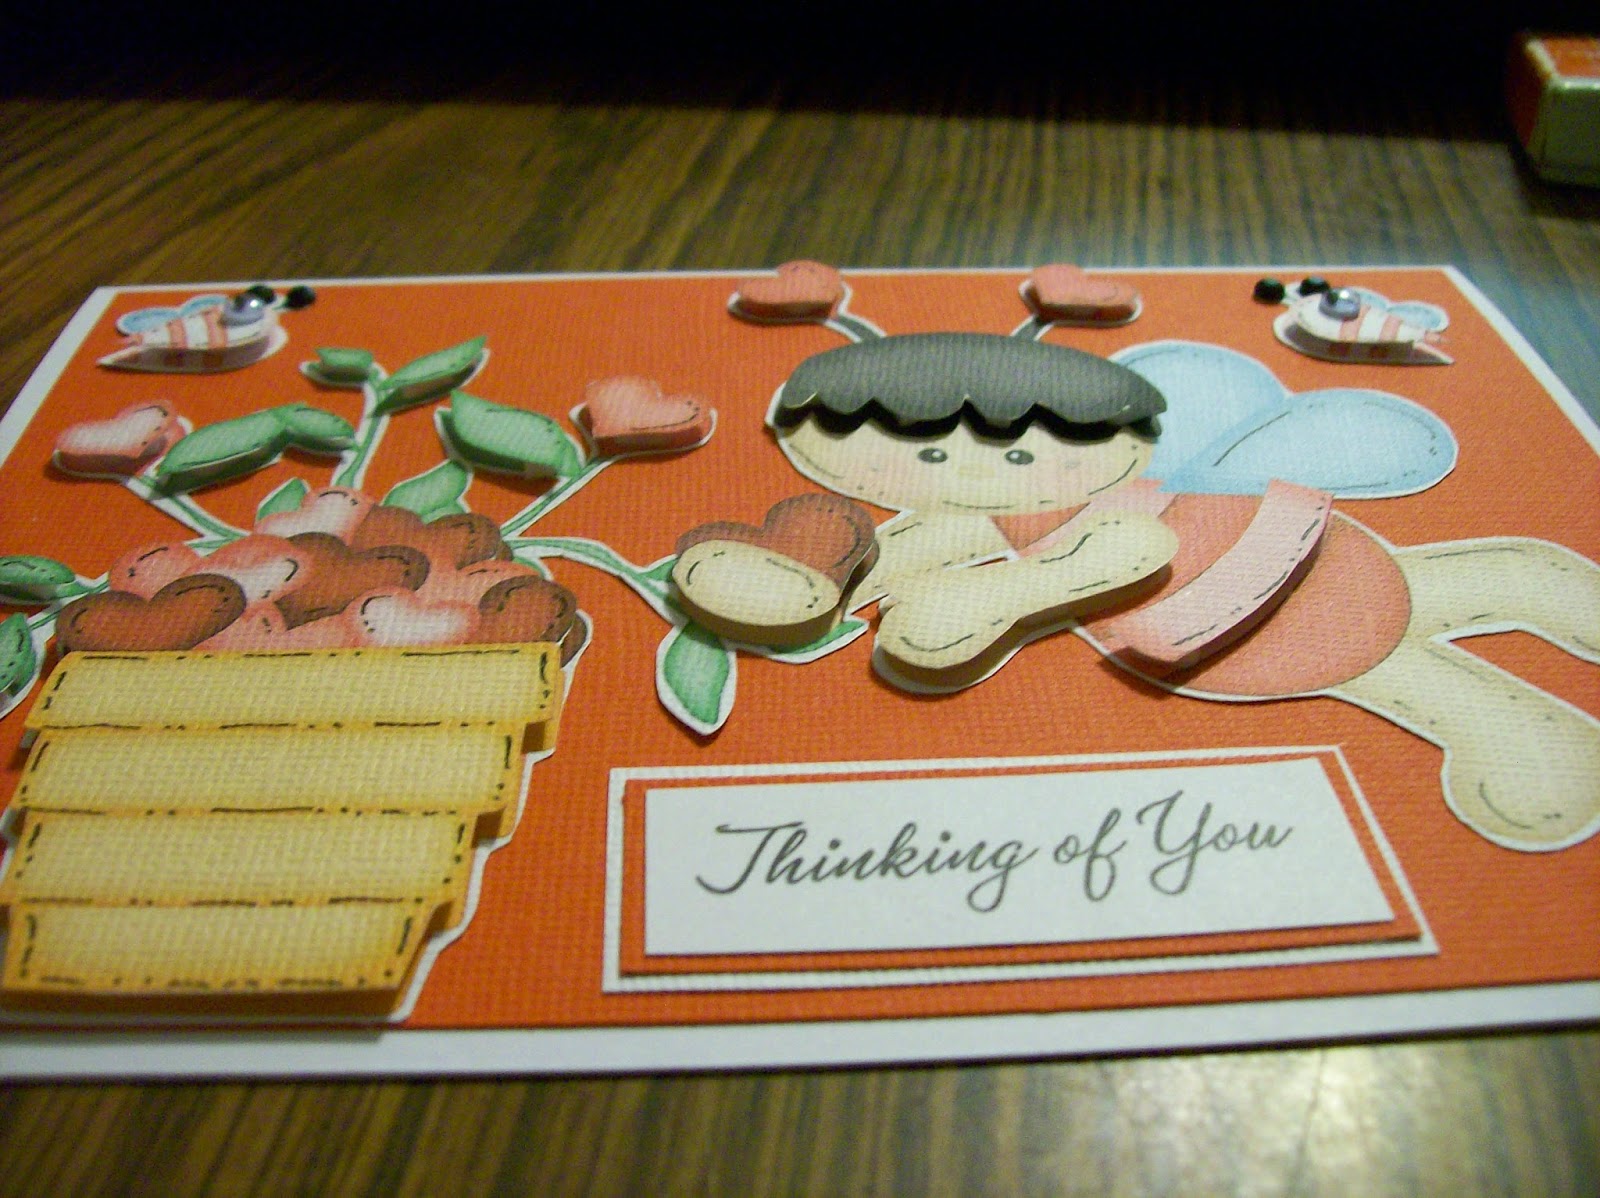
Here are a couple made with the simpler pic.  The pink one has just 7 things popped up, and the green one doesn't have any popped up.  I have a slight addiction to bling! lol  I hope this tutorial helps!


Thursday, August 21, 2014

August 22-24 Blog Hop with Kiwi Lane

Welcome to my blog! You should have arrived here from the Kiwi Lane site, but if not you can always go back there and start.(www.kiwilane.com/blog)  The hop order is listed at the bottom of this post in case you get lost along the way, and you want to come back here and find your way again.

The accessory set that I was asked to design with was the Playtime set.  It's a super fun set!  I made a couple layouts actually, and then posted my favorite here on the hop!  The rocket template was so much fun to work with.  It started out a plain blue piece of paper shaped like a rocket, and then I got creative! :) I decided to add a couple stripes of the paper I used in the layout around the bottom of it.  Well, it still needed something, so I added the lettering.  Still, it seemed to me that it could use a little help popping off the page.  I had bought the cool starburst brads to use on this layout, and decided to add one to each rocket too.  Once I added the little white stitch lines with my gel pen it looked perfect to me!  I hope you like my layout as much as I do, but if not, I added my adorable grandson Keegan the day he was born, and who doesn't love a precious newborn baby! lol Thanks for stopping by, and make sure you leave a comment and let me know what you think!  It will also get you an entry into the drawing for a $25 Kiwi Land Designs Gift Card, and who wouldn't LOVE to have that! I'd love to have you become a follower of my blog as well!


Now that you've seen my layout, left me a comment, and hopefully became a follower of my blog as well, it's time to see what else was created for you to see!  Hop on over to Alicia's blog ( http://www.goldengoddessdesigns.blogspot.com/), and see what is new with her, and don't forget to comment on all your stops along the way!  The $25 Gift Certificate Winner will be announced some time Monday on the Kiwi Lane site.  Good Luck!
Thanks for stopping by to see what I created!  

Monday, August 18, 2014

Turtley Cute Baby Keegan

I made this layout of my grandson Keegan at Physical therapy.  He has torticollis and I would think tortoise in a collar to remember what it was called.  I found the "Turtley Cute" file from KaDoodle Bug Designs the perfect addition to this page.  You can get this file at http://kadoodlebugdesigns.com/shop/index.php?main_page=product_info&cPath=3&products_id=35 Isn't he just the most adorable little guy?  Nana sure thinks he is!


Sunday, May 18, 2014

Grandbaby Number 5 Has Arrived!

I haven't posted in a while because I have a back injury, and a new grandson.  Those of you that know me personally will not be surprised that when I'm feeling good enough to sit in a chair and scrap, I'll be holding baby Keegan instead! He was born on May 9, 2014 and he weighed 7lbs 11 ozs.  He is Nana's favorite newborn Grandson! lol


Thursday, April 3, 2014

April Blog Hop with Kiwi Lane


I'm so excited to be included in this blog hop with Kiwi Lane Designs! If you just came from Jennifer's blog http://craftingmoments.wordpress.com/ then you have arrived at the next  stop in the hop right on schedule, and your next, and final stop is Christina's blog http://tinasscrapcrap.blogspot.com/.  If you just happened upon my blog and this post then hop on over to Kiwi Lane's blog http://kiwilane.com/here/blog and start at the beginning to see all the great projects in our 10 blog hop!  I had so much fun making my 2 page layout to share the Wacky template set, that I had to make a few cards too!  You can find the Wacky template set and many other great templates at  http://kiwilane.com to make beautiful projects,  There are also some amazing videos on their site showing how to use them!  Check them out today and don't forget to hop along with us, and leave a comment at each stop for a chance to win  25.00 in Kiwi Lane Goodies!!! :)


I used the templates to make a sun and clouds for this adorable spring layout for my granddaughter Isabel's birth last year.  My daughter's name is Brandi so I titled the first page when her brother met her for the first time "A Brandi New Baby."  The other I titled "I am 1 beauty of a spring gift I am Isabel Lynn" and they are pics from the next day at the hospital when we took Clayton back to the hospital to see Sissy again.  I chalked the outside edges of my clouds blue, and used gold stickles around my sun.  My biggest scrapping addiction is shiny things.  I love to pop dot things and add gems and stickles or anything else shiny I can find!  I'm not sure which borders I used for the floral print paper at the bottom, or the blue or the words paper up top.  I have a lot of borders to choose from, and I couldn't ever decide which ones I wanted to use to I came up with an awesome system for choosing my borders.  First I reach in to my bag of borders and pick out 3 random border sets.  Then I take the top one and use the narrow border, the middle one for the medium sized border, and the bottom one for large size border.  Unlike a lot of Kiwi Lane users, I do not lay out all my templates first on my 12X12 paper.  I just start tracing and cutting, and then I place them where I like them and just keep adding things until I like the layout! lol  It's a very scientific method of selecting borders for my layouts, ok maybe not, lol, but it works for me! lol


On top of the addiction to shiny things, I also suffer from a severe paper addiction. (please don't share any 12 step program for paper addicts because I don't want any help!!! lol) I had, and still have a little extra paper...imagine that....so I made a few cards to share too!  I also included a couple pics below them showing how I used the wacky templates to make little borders and strips for on my cards by tracing a part of the template, and moving just a little bit and tracing the same side again.  I've also done this with the border templates for on scrapbook layouts.  It adds so many more uses for the same templates, and allows you to use the same template for so many more projects, and they all take on a different look.  Of course you're going to see more stickles and shiny gems on my cards too!  I did try to make a baby shower card without anything shiny, but ended up using tiny gems on my flower centers...so I failed! lol


Here is the line up for the blog hop in case you get lost along the way.  A random winner from ONE of the participating blogs (including the Kiwi Lane blog), will be given a $25 gift certificate to the Kiwi Lane Shop, for leaving a comment, and will be announced on the Kiwi Lane blog on Thursday, April 10TH.  Make sure you follow and leave a comment on all of our blogs for your chance to win this fabulous prize! :)  You have from 8am MST on April 4TH to 11:59 PM MST on Sunday April 6TH to do this.  So..get hopping!!

  1. Kiwi Lane http://kiwilane.com/here/blog/
  2. Gail Owens http://glowormdesigns.blogspot.com
  3. Catherine Povec http://www.tybearsmom.blogspot.com
  4. Jennifer McDermott http://wonkywares.blogspot.com
  5. Kristy Lee http://lifescrapped.blogspot.com
  6. Heather Conklin http://goldiecar.blogspot.com/
  7. Misty Buck http://www.mistylynnwhat.blogspot.com/
  8. Jennifer Nicholes http://craftingmoments.wordpress.com/
  9. Barb Rapp http://www.mommaducksblog.blogspot.com/
  10. Christina Steel http://tinasscrapcrap.blogspot.com/

Saturday, March 1, 2014

Well, I guess the favorite layout made with the Kiwi Lane borders didn't last long, because the butterfly pages beat out my last favorite.  The Best Friends layout made with Paper Piecings by Nikki's Best Friends Flowers and the Kiwi Lane borders is also one of my favorites too.  It's tied with the monkey piecing from Precious Piecings and the Kiwi Lane Borders though, but only because my granddaughter has the perfect monkey pose with her ice cream belly sticking out! lol Then there's the Prarie Chic line from Bo Bunny that I used my Kiwi Lane Borders on.  I think if I had to choose only one paper line that I could use, it would have to be Bo Bunny.  I love almost all of their paper designs they put out. (Butterflies are Bo Bunny too)


Monday, February 24, 2014

Sunday, February 23, 2014

My newest layout I just finished up for the DT Doodles #4 sketch challenge for Kiwi Lane Designs.  My 4 beautiful grandbabies and my great niece.


Friday, February 21, 2014

Here are a couple cards that I whipped up so quick I shocked myself!! I used the Kiwi Lane Designs card border set called "thoughtful".  They turned out super cute, and they were just from scraps I had from a couple layout!  super quick way to use up scraps!!!


Thursday, February 20, 2014

Playing a little catch up on the DT Doodles #2 Sketch Challenge for Kiwi Lane Designs.  Did you know if you complete all of the DT Doodles sketches this year that you have the chance to win a $200 shopping spree in their store?  You didn't? Oh pooh, why did I tell you then?  What was I thinking getting more competition trying to win my $200 shopping spree! lol


I used the Spook Alley and Sunnybrook Lane border sets, and the Wacky accessories set from Kiwi Lane to make this layout.  The other elements are either from a cricut cartridge, sticker sheet, or just hand cut.  Don't worry,  The next layout you see won't be ponies.  It will still be all about my grandbabies though! :)

Monday, February 17, 2014

I managed to get my little fingers on a few more empty wine bottles and got crafty with them today.  I made them for at my cousin's hair salon.  She has a gift shop in the one room there, and she sells them for $12 each.  I think they turned out so cute!  Well, off to order some more wine glasses, and then to add another coat of paint on the ones on my table! Ironically, I don't ever hardly ever drink at all! lol